Where virtual slides have been added to the Atlas, a microscope icon is shown.
To examine a slide, first note the species from which the specimen came.
Note the stain that was used. For most tissues, this will be Haematoxylin and Eosin, the H&E stain which is the most commonly used standard stain worldwide for examination of histological specimens.
The tissue type is also provided.
To navigate the virtual slide:
Pan: Click and hold down the left mouse button and drag the image across the screen to move to a new location on the slide. For tablets use your finger to swipe or drag the image on the screen.
Zoom in/out: Use the +/- buttons to the left of the thumbnail image to zoom in/out, or while the mouse is position on the image use the mouse scroll wheel. On tablets double tap to zoom or use the pinch and spread motions.
Full screen: The blue four arrow button at the bottom right of the thumbnail image allows you to return to the layer view of the slide and return to full screen mode.
Measuring tool: The ruler icon to the left of the Full screen button allows features to be measured on some images. Click once at the edge of the feature you'd like to measure and then click a second time to get a measurement of length or continue to click to create a shape and find the area of the feature.
General advice for examining slides:
At low magnification, assess the strength of staining, the number of structures on a slide, and the general shape of the tissue. Whether the tissue is a tube, a strip, or a solid mass helps you narrow the choice of organ. Keep in mind the three-dimensional, gross structure of organs e.g. a piece of liver will be a solid piece of tissue, while blood vessels and intestines will be tubes or, if they are too large to fit on the slide whole, curved sections of walls.
Note the general distribution of colours of the stain. With practice, it becomes possible to identify muscle, cartilage and other tissues by the colour of the stain.
Next, if necessary (for identification of blood cells for example) use higher magnification. If you have difficulty identifying a section, use a lower magnification.
Annotation layers
Where virtual slides have been annotated, features have been marked with coloured pins or regions to help you identify examples of features of importance.
The left hand panel provides you with information about the annotation layer and a list of features that have been marked on the image. You may need to use the scroll bar to view all of the features annotated.
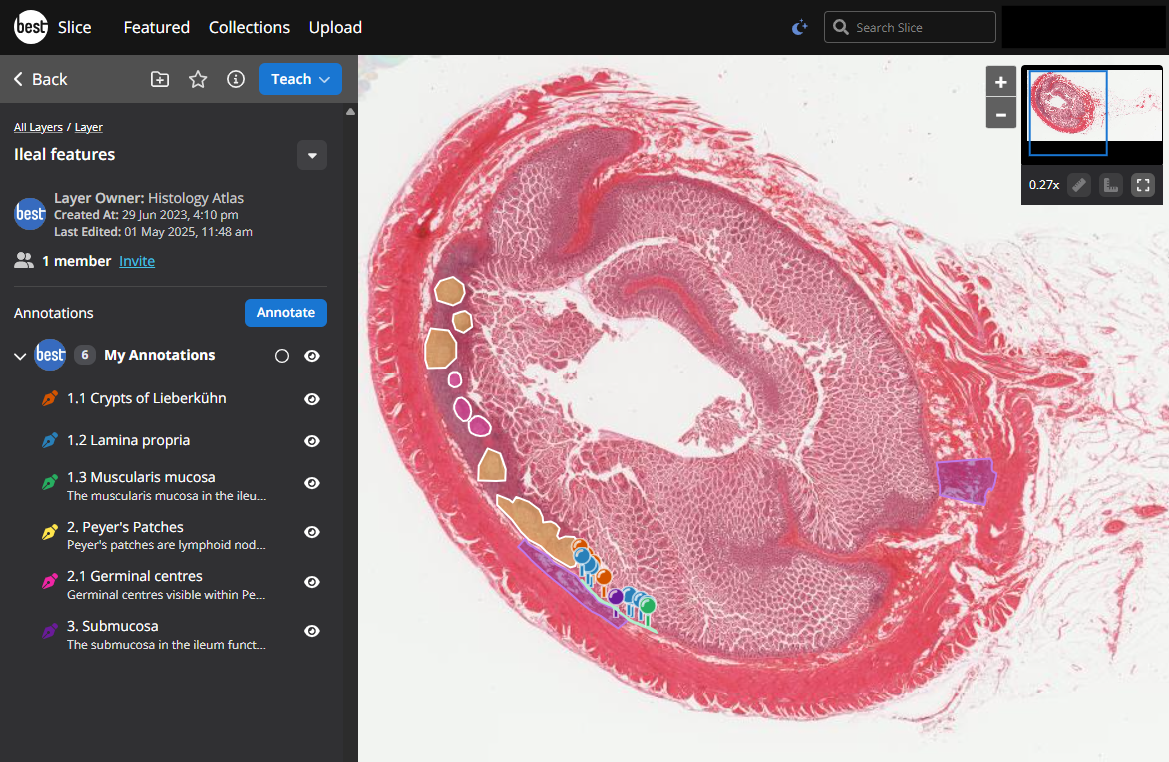
Each feature in the panel on the left has a corresponding pin or region on the image. Click the title of each feature to read more information and show the annotations related to that feature.
Click the name of the layer in the "breadcrumb" list to return to the list of all of the features.
In some places the layer has been shown at full screen mode.
Clicking the pins and regions on the image shows a pop up of information that shows the title and any description provided.