While viewing an image, to create a question, click the Questions button on the left hand panel. This will load a new version of Slice that will provide you with access to the Question tool.
Click the blue Add a question button. Select the drop a pin question type and click Create.
N.B. Other question types are currently unavailable and will be released in the future.

1. Select a pin
Three different pin options are available including a marker, pin and star and can be chosen according to your design preference.

2. Feature to be identified
Each question asks respondents to identify the location of a single feature on an image. Provide a name for the feature in the space provided. You can return to this page to update the feature name if required.

3. Set answer region
Field of view
The question tool allows you to select whether the entire image is shown to the respondents during question answering or only a portion of the image. This is particularly important for virtual slide images that may have multiple examples of the feature across the image.
1. Click Set field of view
2. Adjust the field of view by dragging in the sides or corners of the rectangle

3. Click Confirm to save the selection
The field of view can be adjusted by returning to this screen. Click Clear to return the field of view to the full image and start again. Click Cancel to abandon your changes.

Answer
When creating a question, use the annotation tool provided or previously made annotations to identify all correct regions of the image relating to the feature to be identified.
1. Click Add annotation
2. Select whether you will create a new annotation or use an existing annotation to mark the correct region. When selecting an existing annotation you can add additional regions that will be considered correct. Click Add.

Create a new annotation
a. Select the POLYGON tool and click on the image to start marking the correct region. Continue to click to outline the feature and double click to finish the shape. You can add multiple polygons to mark separate instances of the feature to be identified by clicking the Polygon tool for each new shape. Take care to mark all examples of the feature in your chosen area.
Tip - Return to the field selection and make adjustments if there are too many correct examples in the area you have chosen.

b. Provide written feedback and information about the feature (optional) in the Feature Description box.

c. Select a colour that stands out against the background colour of the feature using the Colour button.

Use an existing annotation
a. A list of all of your personal layers and any publicly available layers is provided. Select one (or more) annotations to add as the answer by checking the box to the right of the annotations name. If you add more than one the two annotations will be combined into a single annotation. Confirm your choice by clicking Add. For the correct answer, only previously made annotations that are a region are shown in the list.

b. Provide written feedback and information about the feature (optional) in the Feature Description box.
c. Select a colour that stands out against the background colour of the feature using the Colour button.
The Answer annotation can be edited by clicking the title or text field at any time or deleted by clicking the trash icon.
Click Next to continue.
4. Other information
Question Prompt
The question shown to students will be automatically generated using the Feature name and the type of pin selected on the previous screen. The question prompt can be edited by clicking the pencil icon.

Additional supporting information can be added that will be used to provide students with context while answering the question. For example you may choose to use this area to provide information regarding the tissue type, disorder shown in the image or "case history" information that supports the question.
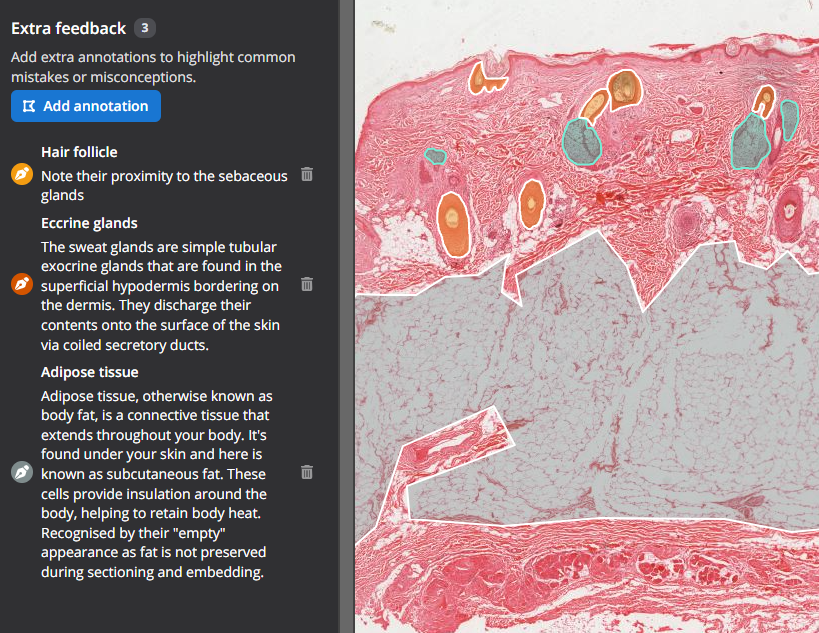
Extra feedback
Additional annotations are optional and can be added to provide context or address common misconceptions. These can be shown to students (optional - see below for further information) after they have made their response.
They can be added by creating a new annotation or by using an existing annotation. However the list also includes annotations that are pins. If adding existing annotations, adding more than one will add them individually to your image along with any text feedback.

Edit each annotation by clicking the title. This can be used to edit the text-based feedback or the shapes on the image.
 |
 |
|---|
5. Settings
The third step when creating a question is to select the settings for the question.

Respondent settings
Use the check box to select whether students will be able to see anonymised responses made by other students.
Answer attempt settings
Select whether you would like students to have unlimited attempts at the question or a set number of attempts.
The Unlimited attempts option provides a check box for students to opt in to receive the answer after they have made an attempt which prevents them from getting stuck for long periods of time. This option also allows them to come back at a later stage (for example during revision for exams) and practise their feature identification.
The set number of attempts provides students with the answer after they have either identified the feature correctly or the maximum number of attempts has been reached. The student cannot reattempt the question.
Answer reveal settings
There are three options available for the answer reveal:
- Display only the correct region(s) when answer is revealed - if additional feedback annotations were added only the correct region will be shown on the image to the students. Other feedback annotations will be greyed out and can be turned on by students. This avoids unnecessary distraction on the image while receiving feedback.
- Display all annotations upon answer reveal. In this example all feedback annotations are revealed at the same time as the correct regions and allows students to see whether an incorrect pin was located on another feature as marked by their teacher and allows for immediate remediation of misconceptions.
- Hide answer and annotations after response has been marked. This option is best for examination purposes and will hide the students response and the correct region from the student and they will not be told whether their response was correct or incorrect.
Labels
Labels help you to differentiate between copies of questions that may be used with different student groups or for different purposes. They are only visible to the question owner.
Examples of how labels may be used:
- Course name
- Tutorial group number to differentiate between uses of the same question with different students groups within the same course
- Year delivered
- Version number
- Purpose
- Record Blooms Taxonomy
6. Review
Take the opportunity to review the question by answering as a student would. To do this:
- Click the pin icon and move the icon provided to a location on the image
- Click Check my response
- Depending on the settings and whether the response is right or wrong you may be given another chance. Click the Pin icon again to place the pin again.
You can return to any of the other question creation tabs by clicking the name of the relevant section.
Click Save and finish to save the question. Then Click Return to Questions to make another question or share this question with students.